Friday, December 4, 2015

Embroidering a name on a stocking

I decided when Little E was born that I would make all of us stockings, using the same pattern but everyone would have different fabric. Since we don't know how many kids we will have, I couldn't preplan and buy matching fabric so it just made it easier if everyone's fabric was different.


Now that Baby L is here, it's time she had a stocking of her own before Christmas. I went with a super easy tutorial. To be honest Nic's, mine, and Emily's stockings were all made before I had a sewing machine. I actually borrowed a friend and since it had been awhile since I had sewed I needed something simple. The only thing I didn't like about this tutorial was that she didn't show had to add names on them. So I wrote up how I added the names in case others would like to the same.

I use this tutorial:

http://blog.fabricworm.com/2010/12/christmas-stocking-tutorial.html

Make both pieces of the stocking.


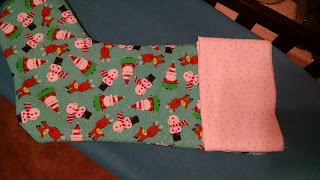
 Take the cuff and pencil the name on the stocking. Cuff should be fold side down. I find it helpful to use a ruler to make sure the name is written straight. I like to lightly pencil it first so if I need to rewrite the name its easy to erase and fix, once you like how it looks you can always darken the name.


With the penciled name, I put it in the stocking, matching up the sides and put a couple of pins in and then flip out to make sure the name will look how I want it to.
 
Name should be facing you, when you put it in the stocking.


 How it looks flipped.

 
 Once you know the name is how you want it, you can start embroidering it.


Once the name is finished, put the cuff back in the stocking. Again making sure the edges line up with each other and the name is centered.

Instead of ribbon, like the tutorial says, I make my own  tie hanging using the cuff fabric. I start with a piece about 2 1/2" by 5". It seems large but with the seam allowance and flipping it right side out it ends up being about the right size. Don't worry about it being exactly the size, I feel like mine is not exact among all of the stocking, you are using scrap fabric. :)

Add your ribbon, or fabric hanging piece, to the stocking


Make sure everything is in the right spot. Finish sewing as directed in tutorial


Now enjoy your beautiful stockings!


Thursday, November 12, 2015

Baked Pizza Ziti

We love everything pizza, but sometimes you need to serve something besides regular pizza for dinner. This Baked Pizza Ziti is a family favorite and also makes a great freezer meal. This recipe can make a 9 x 13 pan or if you have a smaller family like mine you can make 2 8 x 8, and throw one in the freezer.


Ingredients:

Heat pan to medium heat and cook the ground beef, pepper and onion together. Cook the meat until almost done- hardly any pink. Then add garlic. Cook until completely cooked, add salt and pepper to taste. Drain the grease.


 Cook pasta and then mix sauce and pasta together. Put about 1/2 in a 9 x 13 pan or about 1/4 if splitting the recipe.

Sprinkle about 1/2 (or 1/4 of the cheese) over the pasta.

Add the pepperoni.


Then add the meat mixture.

Spoon the ricotta cheese over the meat mixture.
 Add the rest of the pasta, the meat and more pepperoni.
 Cover the dish with mozzarella cheese. (Try to make sure no noddles are sticking out, otherwise they may get dried out in the oven.
 Since my family doesn't need a full 9 x 13 pan, I make 2 8 x 8 s and put one of them in the freezer and eat one the night I make it.


Cook for about 35-40 minutes if doing a 9 x 13 pan, or about 20-30 minutes if doing the 8 x 8 pan. Cook until all of the cheese is melted and turning slightly golden.


Baked Pizza Ziti
Recipe by Prescriptions for a Happy Home

Ingredients:
26- 28 oz of your favorite spaghetti sauce
1 lb of ground beef
1 green pepper
1 onion
1 15 oz container of ricotta cheese
1 package of pepperoni
1 16 oz package of ziti or other tubular pasta
16 oz of shredded mozzarella cheese
1 tsp of garlic

Directions:
Preheat over to 350 degrees.

Cook pasta until al dente.

Heat pan to medium heat and cook the ground beef, pepper and onion together. Cook the meat until almost done- hardly any pink. Then add garlic. Cook until completely cooked, add salt and pepper to taste. Drain the grease.

Mix sauce and pasta.

Lightly grease a 9 x 13 pan (or 2 8 x 8 pans).

Pour 1/2 of the pasta into the 9 x 13 pan. Then about half of the mozzarella cheese. Evenly spread the pepperoni over the pasta and cheese. Sprinkle the meat mixture on top. Spoon ricotta cheese on top of the meat. Put the remainder pasta mixture on top. Sprinkle the rest of the meat. Then spread the pepperoni on top of the meat. Cover the entire pan with mozzarella cheese.

Cook for about 35-40 minutes until cheese is melted and bubbly. (If cooking the 8 x 8 pan cook 20-30 minutes)

Serves about 8.

*When you are ready to cook the freezer meal, put in fridge about 24 hours before serving. Cook at 350 for 30-40 minutes - until cheese is melted and no longer frozen.

Enjoy!


Thursday, October 8, 2015

Chocolate M&M Cookies

I love chocolate cookies, and chocolate cookie dough. :) These cookies will not disappoint if you like soft cookies! And I won't blame you if you eat all of the cookies dough before any of it makes it into the oven.


There is vanilla pudding in the mix, which helps make these cookies soft and chewy instead of crunchy.

I use the brand Jello:


I generally get one of the larger boxes and put it in a Tupperware container, so I always have vanilla on hand when I make cookies and the vanilla doesn't go to waste.

We are kind of obsessed with our silpat in our home, and use it for cooking everything, especially cookies, if you don't have one I highly recommend them.


Chocolate M&M Cookies
Recipe by Prescriptions for a Happy Home

1/2 c softened butter
1 c sugar
1 egg
1/2 tsp vanilla
1/2 tsp baking soda
1/2 tsp salt (unless using salted butter like I do. )
2 tablespoons vanilla pudding mix
1/2 c cocoa
1 1/4 flour
1/2 cup chocolate chips
1/2 cup mini M&Ms (regular would work too)


Cream sugar and butter together.. Mix in egg and vanilla. Then add baking soda, salt, vanilla. Slowly add cocoa and flour.

Cook on silpat mat at 350 for 8-10 minutes. Cookies will be soft but with solidify as they sit. Keep on cookie sheet for a couple of minutes.

These cookies only make a couple of dozen, since I have no self control. ;)

I generally make a couple at a time, and then store the dough in an air tight container in the fridge until I make the next batch. Warm cookies every time without becoming a hoarder. 

Enjoy! 


Wednesday, September 16, 2015

Pizza Dip


Today I am sharing our favorite football party appetizer.  We love this pizza dip! It is so good and really simple to make.  Make this dip for your next football party, it is sure to be a winner!


Start by combining an 8 oz block of cream cheese (regular or low fat) with some oregano, parsley, and basil.  Spread into a greased 8 or 9 inch baking dish. I like to use my deep pie pan for this dip. 

 Next, sprinkle 1/2 cup each of mozzarella and Parmesan cheese on top of the cream cheese.

Spread 1 cup of pizza sauce evenly over the cheese.

Top with another 1/2 cup each of mozzarella and Parmesan cheese and then the pepperoni and other toppings. We usually just use pepperoni, but other pizza toppings are fun to try.

Bake, uncovered, at 400 degrees for 15-20 minutes or until the cheese is melted and bubbly.  Yum!

Serve with toasted baguette slices.


Enjoy!


Pizza Dip
Recipe by : Prescriptions for a Happy Home

Ingredients:
1 8oz. block of cream cheese, at room temperature
1/2 tsp. oregano
1/2 tsp. parsley
1/4 tsp. basil
1 c. shredded mozzarella cheese, divided
1 c. shredded Parmesan cheese, divided
1 c. pizza sauce
1/2 c. pepperoni (we like to use the mini pepperoni, but regular pepperoni works great, too)
2 T. each additional pizza topping, optional

1 loaf baguette or other crusty bread, toasted


Directions: In a small bowl combine the cream cheese with the oregano, parsley, and basil.  Spread evenly into a greased 8 or 9 in square or round baking pan. (I sometimes use a pie pan) Sprinkle 1/2 cup of each cheese on top.  Spread the pizza sauce on top of the cheese.  Sprinkle the remaining cheese on top of pizza sauce, followed by the pepperoni and other pizza toppings if you are adding additional toppings.  Bake at 400 for 15-20 minutes, until the cheese is melted and bubbling.  Serve with toasted bread.  


Thursday, September 10, 2015

Noah's Ark Quiet Book Page

Awhile back, I posted a link on how to make animal puppets.  Today I am sharing a pattern for making a Noah's Ark Page for a quiet book. My book is 8" by 8".


Cut out the pieces for Noah. I had "dress" piece in orange and red. A belt in yellow. Two pieces of red for the vest - which matched the other red dress piece so it would look like a robe. Use whatever colors you would like. I waited until I had all of the pieces sew together before I did his hair. Sew his face on, and then do the hair so that the hair on the back of his head will cover the stitches.

Noah Pattern.


For the ark, cut out the boat pieces (there are 3) and then 3 windows (I chose to do grey).

Ark Pattern


Wednesday, September 9, 2015

BYU Football Party Ideas with Free Printables!


Football season is here! Our BYU Cougars won their first game and we are excited to cheer them on again this week.  Print out these free games to use at your next BYU Football Party!   


Cougar Fight Song Fill in the Blank

Cougar Fight Song Printable (PDF)


BYU Word Search

BYU Word Search Printable (PDF)

No football party is complete without yummy food! Add some of these easy blue and white treats to your next football food spread.

Chocolate covered pretzels.  Melt some white baking chocolates and dip half of the pretzels in the white.  When you have about half of the chocolate left add a couple drops of blue food coloring to make your blue pretzels.  Add some blue white sprinkles if desired.


Use a bag of blue tortilla chips and regular white tortilla chips and mix them together.  Serve with hummus/guacamole/salsa.


Get a bag of Almond Joy Pieces and just put out the blue and white ones.  Use blue Gatorade or Kool-Aid for drinks.


Happy Football Season!

Go Cougars!!


Thursday, September 3, 2015

30th Birthday

30th birthdays can be hard for some people; I made this fun little birthday kit for one of my friends 30th birthdays.

"Now that you're 30 (and a mom), you may find yourself wondering where the years went.
In case of emergenc, the items in this kit can make you feel young again."


There are so many options of things you can include in this kit and even specialize it to the friend you are giving it to. I thought Target was helpful in coming up with items, but really you can shop anywhere or use several different stores. 

I had one item for every category.

Slumber Party Ideas:
  • Sleeping face mask
  • Fleece blanket
  • chick flick and popcorn
  • new pjs
Give yourself a makeover:
  • favorite makeup products (mascara, eye shadow, etc).
  • Nail polish with nail files
  • body spray
  • Hair accessories
Play dress up:
  • Fun socks
  • jewelry
  • hair accessories
  • gift card to a clothing or jewelry store
Have girl time (this category may have overlap with the other categories so either don't include it or use an item you haven't used yet).
  • magazine
  • book
  • chick flick
  • nail polish
  • hot chocolate and mug
  • brownie mix
When all else fails eat chocolate:
  • include favorite candy bar
  • bow of chocolates

Printables:

Thursday, August 27, 2015

Hair Bow Organizer

Little E has a lot of hair bows and headbands, and with another little girl on the way I really wanted to find a good way to store everything.

I was able to make this cute but practical hair bow organizer for less than $5!


I bought this frame at Goodwill for $2.99.

I removed the glass and mats and painted it white. I used the same paint used to paint the walls in our house. It was thick enough paint that it covered up the dark wood, although I still needed to apply a couple of layers.


My husband screwed in these Cup Hooks for me. I bought a pack for $1.99 at Meijer. Don't buy them at Michaels or Joanns I feel like they overcharge you. You can buy a pack at Target, Walmart, Meijer, Fred Meyer or any store that sells hooks.

I hot glued some ribbon to the back of the frame. I found that the thin ribbon didn't hold the ribbons, but I didn't want a ribbon that was so thick the ribbon would fold when the clips were attached. Min ribbon was about 2.5" long but chose one that works well for your hair bows.

Attach the bows in any order you want!


Hang up with all the bows!


Add headbands to the Cup Hooks.